When a custom trading card run comes back wrong, the artwork is rarely the culprit. The file setup is. Cards are printed on a larger sheet and then cut down, and that cut is where good designs go to die: a background that stops at the edge leaves white slivers, a name set too close to the border gets sheared off, and a file built at the wrong dimensions produces cards that do not fit a standard sleeve. None of that is a printing defect. It is a specification you controlled and got wrong. Setting the file up correctly is a short, mechanical process, and it is worth doing before you fall in love with the art.
Start with the right card size
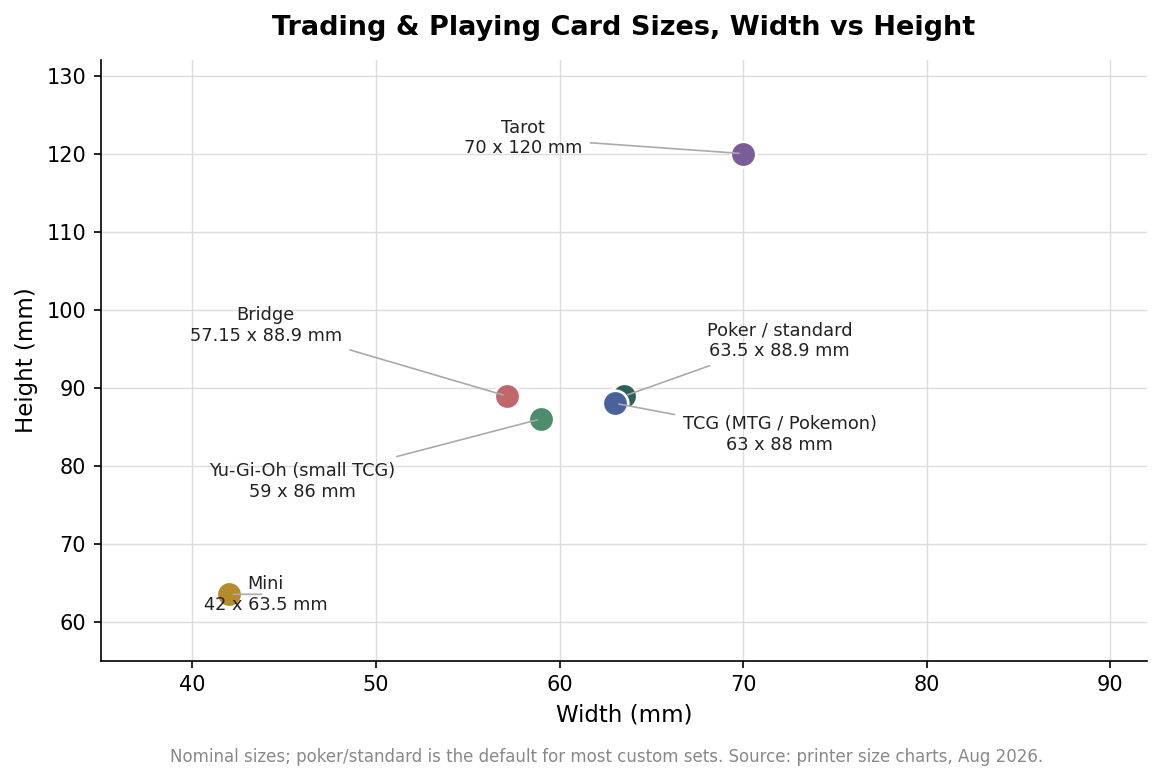
The default for almost every custom set is the poker or standard size, 2.5 by 3.5 inches, which is 63.5 by 88.9 millimeters. It is what commercial trading card games use, what card sleeves are built for, and what your customers expect to hold. The mass-market trading card games run a hair smaller at roughly 63 by 88 millimeters, and there is a small-TCG size near 59 by 86 millimeters, but unless you are deliberately matching an existing game, pick poker size and move on.
The other sizes exist for specific reasons. Bridge, 2.25 by 3.5 inches, is narrower and easier for small hands to fan. Tarot, 2.75 by 4.75 inches, is large enough for detailed illustration and oracle-style decks. Mini, 1.65 by 2.5 inches, suits novelty and insert cards. The one hard rule: if your cards need to live in off-the-shelf sleeves or a specific deck box, choose the size those accessories are made for before you design anything, because a nonstandard size quietly commits you to custom sleeves too.
Build the file around three rectangles
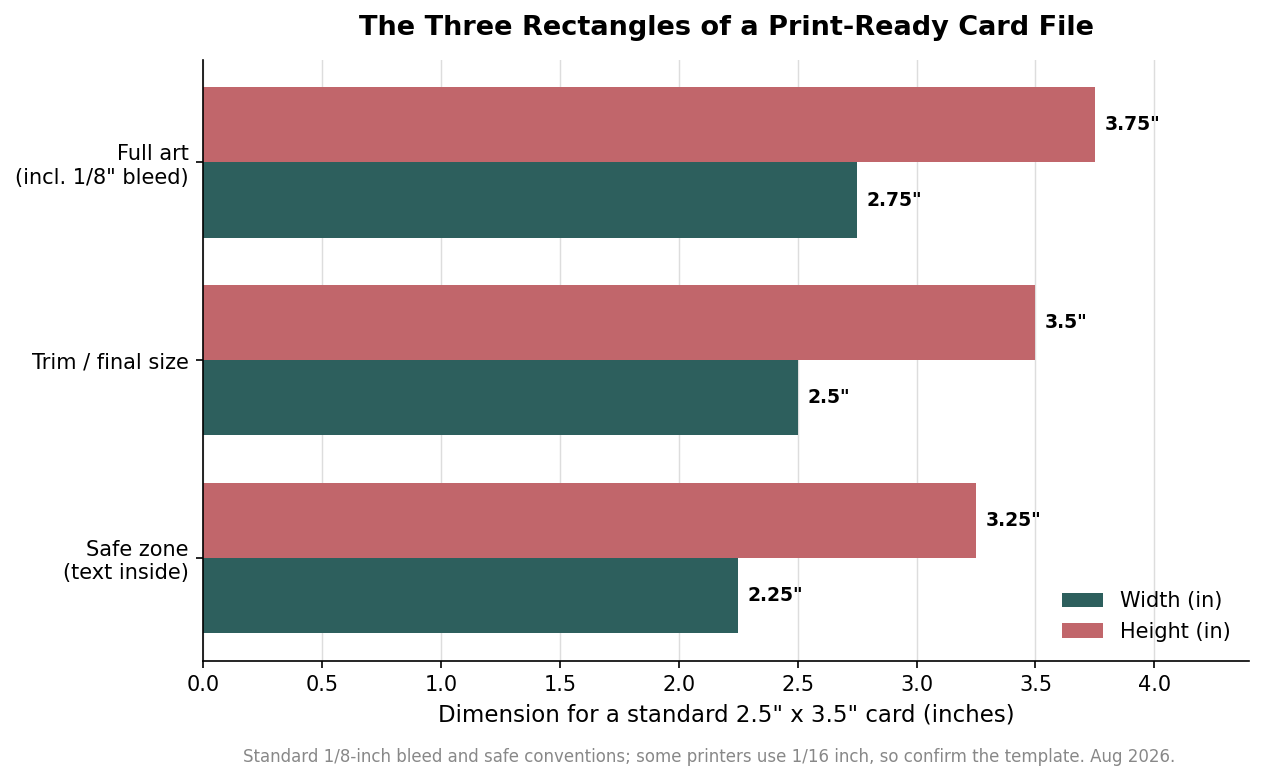
Every print-ready card file is really three nested rectangles, and understanding them prevents nearly every cutting problem. The trim rectangle is the final card, 2.5 by 3.5 inches. The bleed rectangle is larger, extending the artwork past the trim so that when the blade drifts slightly, there is still ink where the edge should be; most printers ask for a one-eighth-inch bleed on every side, which turns a 2.5 by 3.5 card into a 2.75 by 3.75 art file. The safe zone is smaller than the trim, and it is where all your important content lives: names, numbers, logos, and stat boxes should sit at least an eighth of an inch inside the cut line so the trim never clips them.
The single most common mistake is treating the trim line as the edge of your background. It is not. Any color or image that is meant to reach the edge of the finished card has to be pushed all the way out into the bleed, or you will get thin white borders on one or two sides after cutting. Some printers use a slightly smaller one-sixteenth-inch bleed, so download the specific template for the press that will run your job rather than assuming the numbers.
Resolution and color mode
Two settings decide whether your file prints crisp and on-color. Build the artwork at 300 DPI at final size; a logo that looks sharp on screen can be a fraction of that resolution and will print soft and pixelated once it is committed to card stock. And work in CMYK, the four-ink color space presses actually use, not the RGB space your monitor displays. RGB files get converted to CMYK at the printer, and the conversion dulls bright blues, greens, and neons in ways that surprise people who only ever saw the screen version. If exact brand color matters, ask whether the printer supports a Pantone spot match and specify the code rather than trusting the on-screen preview.
Corners, cut tolerance, and why the safe zone is not optional
Trading cards ship with rounded corners, and the corner radius is a spec your printer sets, so confirm it rather than guessing. More importantly, understand why the safe zone matters: industrial cutting is accurate but not perfect, and the cut can drift by roughly a millimeter in either direction on any given card. That drift is indicative, not a guarantee, and it is exactly why bleed and safe margins exist. A design that respects both zones tolerates that drift invisibly; a design that ignores them turns normal cutting variance into visible defects. Do not fight the tolerance, design inside it.
A short pre-flight before you upload
Before you send the files, walk through five checks. Confirm the dimensions match your chosen card size with bleed added. Confirm the background bleeds fully to the art edge on every side. Confirm all text and logos sit inside the safe zone. Confirm the file is 300 DPI and CMYK. And confirm you have used the printer’s own template rather than a generic one, since bleed and safe margins vary between shops. Running that list takes a couple of minutes and catches the mistakes that otherwise cost you an entire print run and the lead time to redo it. The design is the fun part, but the setup is what determines whether the cards you imagined are the cards that arrive.